To make the inside of Windows 7 more original, you can change not only the theme and design, but also the icons of standard folders, recycle bin, start, and files. The easiest way is to take advantage of the capabilities of the system itself, but if you wish, you can install programs and unique icons from the Internet.
How to change the start icon on Windows 7?
For the sake of variety, sometimes you want to change the start icon in Windows, because seeing the standard image every day is boring. How to do it for the seven?To change the start button, use the Windows 7 Start Button Changer program. It can be downloaded for free.
The easiest option
If you have downloaded the program to your computer, then just run it. But be sure to do it as an administrator. And then it will be enough to choose the icon you like, replace it and enjoy the new button.If everything worked out for you, you can stop there. However, sometimes there are difficulties, so it will take a little more steps and work with a file called explorer.exe.
Option to change the explorer.exe file
Go to the system drive C. Find Windows folder, open it and find the file we need there. It will be called explorer.exe.We click with the mouse (its right button) to drop out a list with items. There we select "Properties".

Open the "Properties" item, tabs will appear there. We need Security. A list of users will appear in the window. Select the group called "Administrators" and click on the "Edit" button.

In the next window, in the permissions for the group, you need to check the boxes in the vertical column "Allow" in front of all the items in the box. Don't forget to apply the changes and agree to the new permissions.

Now back to the "Security" tab, we need to additionally set permissions for changes. The button is called "Advanced" and changing this setting will enable special permissions for the Administrator group.

In the tab that opens, select the line "Administrators" with one click of the mouse. Click on the option to change permissions.
If you did everything correctly, in the "Permission" column opposite the "Administrators" group, you will have "Full Control" rights. In normal mode, by default, permissions are displayed at the Read and Execute level.
In the window that appears, you will need to change the details of the permission and for this you need to click on the "Change" button. The next window will be called Permission Element. In the "Allow" column, check all the boxes. We agree with the changes.

Please note that the Owner tab should display your account name or Administrator name.
Now we have all the rights to make changes at the system level. We launch Windows 7 Start Button Changer, first download and install it. Right click on the icon and run as administrator.

There you need to select an item called "Change Start Button". We will need a "Sample Orbs" folder. This is a special archive with a set of buttons. Choose which one you like best, click "Open".

To undo the changes, just click on the button called "Restore Original Explorer Backup" and the start icon will return to its original form.
How to change file icon in Windows 7?
For those who want to change the personal settings of the computer for themselves and make the file icons different, this step-by-step instruction- the most accurate.After completing all the steps, you can now always change the icons as you wish. Moreover, you do not need third-party applications or additional programs, as in the case of replacing the start icon, here you can get by with the standard tools of the seven.
The icons themselves can be downloaded from the Internet or even ordered from a designer if you want something truly unique.


Do not forget to save the data after the changes made by clicking "Apply" and "OK".
How to Change Folder Icons in Windows 7
Changing the icon of a folder will allow you to make it unique by highlighting it from the general row. The steps are quite simple, so even if you are a beginner, you can easily figure out the procedure.
If for some reason you did not like the result, then you can return everything by opening the same path: Properties - Settings - Change icon. The last tab has a "Restore Defaults" feature. By clicking on it, you will restore the icons that are present in the system by default.
Installing Icons with IconPackager
There is another way that allows you to change folder icons to any other. To do this, you can use the convenient IconPackager utility.
If your collection does not contain icons for certain types of files or programs, the icons of these objects will remain the same - without changes.
It happens that you need to return the icons back. In this case, in the same program, click on "Windows Default Icons By: Microsoft" at the bottom of the screen from the available icons and apply the rule by clicking on "Apply icon package".
Other programs to change icons
To install icons, the tools suggested above are not always enough. For example, you liked an icon, and it is only in the PNG extension, while installing new icons requires the ICO extension. In this case, two programs will come in handy:- AveIcon 2 is a small program that can convert icon files from PNG and ICO.
- IrfanView is a utility that comes in handy if you need to convert an entire collection of icons at once.
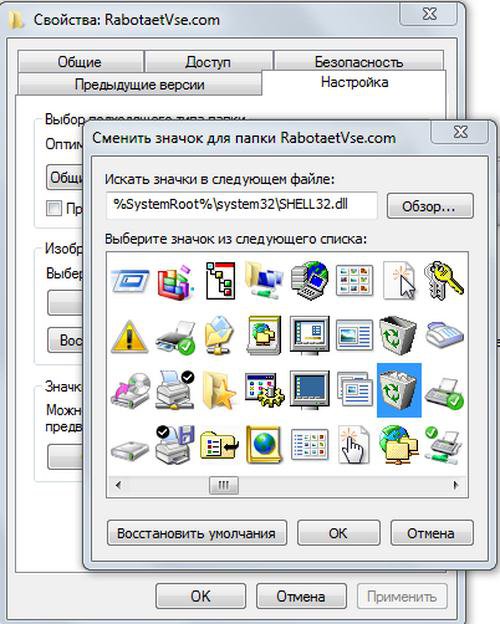
How to change the trash icon in Windows 7?
In order to change the trash can icon, other operations are required. Access through the "Properties" will not work.
Video on replacing standard icons in the seven
Watch a visual video instruction on how to change the default icons to your own:
Some users carelessly refer to the choice of interface design theme operating system. And I must say that in vain, since its correct selection reduces the load on the eyes, helps to concentrate, which, in general, leads to an increase in efficiency. Therefore, if you spend enough time at the computer a large number of time, using it for work, then experts advise choosing background images with calm tones, in which there are no aggressive colors. Let's see how to set a suitable background on a computer running Windows 7.
Interface design can be divided into two main components: desktop background (wallpaper) and window color. Wallpaper is directly the picture that the user sees when the desktop is displayed on the screen. Windows are the front-end area of Windows Explorer or applications. By changing the theme, you can change the color of their frames. Now let's directly see how exactly you can change the design.
Method 1: Use built-in Windows themes
First of all, let's look at how to install the built-in Windows themes.
- Go to the desktop and right-click on it. Select an item from the dropdown list "Personalization".

You can also go to the desired section through the menu "Start". Click on the button "Start" in the lower left corner of the screen. In the menu that opens, go to the item "Control Panel".

In the launched Control panels go to subsection "Changing Theme" in the block "Appearance and Personalization".
- The tool is launched, which has the name "Changing the picture and sound on the computer". The options presented in it are divided into two large groups of objects:
- Aero themes;
- Basic and high contrast themes.
Choosing a background from the Aero group allows you to make the design of the interface as presentable as possible, thanks to a complex combination of shades and the use of a translucent window mode. But, at the same time, the use of background images from this group creates a relatively high degree of load on computer resources. Therefore, it is not recommended to use this type of design on weak PCs. This group contains the following topics:
- Windows 7;
- Characters;
- scenes;
- Nature;
- landscapes;
- Architecture.
Each of them has an additional option to select a desktop background from the built-in pictures. How to do this, we will discuss below.

Basic options are represented by a much simpler type of design with a high degree of contrast. They are not as visually appealing as the Aero themes, but their use can save system computing resources. The following built-in themes are located in the specified group:
- Windows 7 - simplified style;
- High Contrast #1;
- High Contrast #2;
- Contrasting black;
- Contrasting white;
- Classic.

So, choose any of the options you like from Aero groups or basic themes. After that, double-click the left mouse button on the selected element. If we select an element from the Aero group, then the desktop background will be set to the image that is first in the icon of a particular theme. By default, every 30 minutes it will change to the next one and so on in a circle. However, only one version of the desktop background is attached to each base theme.


Method 2: choosing a topic on the Internet
If you are not satisfied with the set of 12 options that is presented by default in the operating system, then you can download additional design elements from the official Microsoft website. It presents a selection divided into categories, many times greater than the number of topics that is built into Windows.


In addition, many other themes can be found on third-party sites. For example, the design in the style of the Mac OS operating system is especially popular.
Method 3: Create Your Own Theme
But often the options built-in and downloaded from the Internet do not satisfy users, and therefore they apply additional settings related to changing the desktop image and window colors that meet their personal preferences.
- If we want to change the background image on the desktop or the display order, then we should click on the name at the bottom of the image change window "Desktop background". Above the specified name is a preview picture of the currently set background.
- The background image selection window is launched. These pictures are also called wallpapers. Their list is located in the central region. All pictures are divided into four groups, navigation between which can be done using the switch "Image Locations":
- Windows desktop backgrounds(there are built-in pictures, divided into groups of topics that we consider above);
- Image Library(here are all the pictures located in the folder "Images" in the user profile on disk C);
- Most Popular Photos(any pictures on the hard drive that the user accessed most often);
- solid colors(a set of backgrounds in one solid color).

The user can check the boxes next to those pictures that he wants to alternate when changing the desktop background, in the first three categories.


If the presented set of pictures does not contain the image that the user wants to set as the desktop background, but the desired picture is on the hard drive of the computer, then click on the button "Review…".

A small window opens, in which, using the hard disk navigation tools, you need to select the folder where the desired picture or pictures are stored.

After that, the selected folder will be added as a separate category to the background image selection window. All image format files located in it will now be available for selection.

In field "Image Position" it is possible to set exactly how the background image will be located on the monitor screen:
- filling(default);
- Stretch(the picture is stretched across the entire screen of the monitor);
- Centered(the picture is used in its natural size, located in the center of the screen);
- pave(the selected picture is presented as small repeating squares all over the screen);
- To size.

In field "Change images every" you can set the time interval for changing the selected patterns from 10 seconds to 1 day. There are 16 different period setting options in total. The default value is 30 minutes.

If you suddenly, in the process of working, after setting the background, do not want to wait until the next background image changes, according to the set change period, then right-click on an empty area of \u200b\u200bthe desktop. Select an item from the pop-up menu "Next desktop background image". Then the desktop image will immediately change to the next object installed in the order of the active theme.

If you check the box next to "In random order", then the pictures will change not in the order in which they are presented in the central area of the window, but in a random one.

If you want to change between all the images located in the background image selection window, then you should click on the button "Select all", which is placed above the image preview area.

If, on the contrary, you do not want the background image to change with a specified frequency, then click on the button "Clear all". All items will be unchecked.

And then check the box next to one of the pictures that you constantly want to see on your desktop. In this case, the field for setting the frequency of changing pictures will no longer be active.

After all the settings in the background image selection window are completed, click on the button "Save Changes".
- Automatically returns to the window for changing the image and sound on the computer. Now you need to move on to changing the color of the window. To do this, click on the item "Window Color", which is located at the bottom of the window for changing the image and sound on the computer.
- The window color change window is launched. The settings located here are reflected in changing the shades of the borders of windows, menus "Start" and taskbar. In the upper part of the window, you can choose one of 16 basic design colors. If there are not enough of them, and you want to make finer adjustments, then you should click on the item "Show Color Adjustment".

After that, a set of additional color adjustments opens. Four sliders allow you to adjust the intensity, hue, saturation, and lightness levels.

If you check the box next to "Enable transparency", the windows will become transparent. With a slider "Color Intensity" You can adjust the level of transparency.

After all the settings are done, click on the button "Save Changes".
- After that, we again return to the window for changing the image and sound on the computer. As you can see, in the block "My Topics", which contains topics created by the user himself, a new name has appeared "Unsaved Theme". If it is left in this status, then with the next changes in the desktop background settings, the unsaved theme will be changed. If we want to leave the ability to turn it on at any time with exactly the set of settings that we set above, then this object must be saved. To do this, click on the inscription "Save Theme".
- After that, a small save window is launched with an empty field "Theme Name". Here you need to enter the desired name. Then click on the button "Save".
- As you can see, the name that we assigned appeared in the block "My Topics" window for changing the image on the computer. Now, at any time, it is enough to click on the specified name so that this particular design is displayed as a desktop screensaver. Even if you later perform manipulations in the background image selection section, these changes will not affect the saved object in any way, but will be used to form a new object.


Method 4: change wallpaper through the context menu
But the easiest way to change the wallpaper is to use the context menu. Of course, this option is not as functional as creating background objects through the image editing window, but at the same time, its simplicity and intuitiveness attracts most users. In addition, many of them are quite enough to simply change the picture on the desktop without complex settings.
We pass with Windows Explorer to the directory where the picture is located, which we want to make the background for the desktop. Click on the name of this image with the right mouse button. Select an item from the context list "Set as desktop background", and the background image will change to the selected image.

In the window for changing the image and sound, this picture will be displayed as the current image for the desktop background and as an unsaved object. If desired, it can be saved in the same way as we considered in the example above.

As you can see, the operating Windows system 7 has in its arsenal a huge set for changing the design of the interface. In this case, the user, depending on their needs, can choose one of 12 standard themes, download a ready-made version from the official Microsoft website or create it yourself. The latter option involves design settings that will most accurately meet the user's preferences. In this case, you can choose pictures for the desktop background yourself, determine their position on it, the frequency of the change period, and also set the color of the window frames. Those users who do not want to bother with complex settings can simply set the wallpaper through the context menu Windows Explorer.
The start menu is located on the taskbar and is a clickable ball containing the Windows logo. If you click on the ball, our eyes will be presented with a set of recent running programs and a list of the most necessary items. To make your PC unique and personalized, check out how to change the start button in windows 7 all editions(Maximum, Home Basic, etc.) in this manual.
When installing a theme in Windows 7, in most cases, the "start" remains unchanged, as it is tied to the explorer (explorer.exe). To fit it into the current design, use the programs and pens to change appearance.
Change the start button through the program Windows 7 StartOrbChanger (W7SOC)
Free program W7SOC, which is able to change the start button on Windows 7 with a couple of mouse clicks. W7SOC has a simple interface and is easy to operate. She works:
- With all DPI (if the image is too large or small, the utility will resize itself).
- With X86/32 - bit and X64/64 - bit OS versions.
- With PNG and BMP graphic formats.
To change the start icon in Windows 7, do the following tasks:
1. Download the program here and extract it from the archive.
2. Right click on w7soc.exe and enable it as administrator.
3. At the main window, the interface is nowhere simpler. At the top, the 3 states of the start button are shown: default (default), on hover (hover) and when pressed (pressed).
After the states, there are 2 buttons:
- Change - helps to specify the path to PNG and BMP and changes the start button.
- Restore - Resets the changes and restores the default icon.
To expand the settings, there is an arrow at the bottom right.
4. Click on the arrow and you will see an additional menu. In the picture below the numbers, see the decoding. The menu has the following items:
- Change the start button by making changes to the RAM.
- Change the start icon by replacing the original file %WINDIR% explorer.exe.
- Adds a "Start Orb" shortcut to the right-click desktop context menu. This way you can quickly turn on W7SOC.
- Adds a "Set As Start Orb" option to the menu when right-clicking PNG and BMP files. When you select this weave, the appearance of the start button instantly changes.
- Turns off the appearance of a success message.
- When starting the utility, it always displays the extended menu.
- Shows the process running in cmd. called command line Windows 7, a cycle is made and after pressing any key, the start changes and acquires a new icon.

5. Customize W7SOC for yourself and click "Change" and specify the path to the icons. There are already 11 different buttons in the "start buttons" folder, select any and click "open". You can also download from the web or draw your own.

The explorer will restart and start button change icon to the selected one. If you want to return the old icon, then click "Restore".
Important! If the taskbar and desktop have disappeared, open the task manager, click file - new task and type explorer.exe in the line and press Enter. If nothing works, then in cmd enter the command to restore the system files SFC / SCANNOW, press Enter and wait for the procedure to end.
Change with Windows 7 Start Button Changer (W7SBC)
You can change the start menu icon with another W7SBC utility. Worse than the first option, but the result is similar. It is advisable to create a system restore point, or skip this step and use the restore command in case of damage to system files.
1. Download the utility here and extract the archive.
2. Run Windows 7 SBC.exe from the W7SBC folder as an administrator. Do not change the folder name, this action can lead to problems.

3. The current launch design will be displayed on the left side of the main window. With 1 line, it becomes possible to change the start button in Windows 7. The line below restores the default icon. Press line 1 with rounded logo.

4. Specify the path to the downloaded or ready (folder 10 Sample Orbs) bmp file. Click "open". Wait until the explorer restarts and see the result.

If you want to return the "start", then click on the explorer icon to restore the original files. Wait for the reboot of the explorer, then, if successful, you will see such a sign.

If you need to change the start button again, first restore the original, and then put a new icon.
If you have followed the steps and the start has not changed, do this:
- Close the program.
- Manually take ownership of the C:Windowsexplorer.exe path.
- Run the program, repeat the steps.
change start button in windows 7 won't be too stressful. For harmony, change the color of the taskbar so that they match perfectly. Of the 2 programs, W7SOC is preferred, it has a number of flexible settings that expand the functionality.
- Change the start icon by replacing the original file %WINDIR%\explorer.exe.


- Close the program.
- Manually take ownership of the C:\windows\explorer.exe path.
www.nastrojcomp.ru
Change the icon of the start button in windows 7
Changing the Windows 7 start menu button icon is almost as easy as putting a new wallpaper on your desktop. In this note, I will tell you how to do this to diversify the look of your windows.
1. Selecting an Icon for the Start Menu Button
A huge collection of icons for the menu is on the Deviantart website. Their number is constantly increasing due to the efforts of users.
Especially for the readers of my blog, I have selected the most interesting, in my opinion, Start menu icons. Just click on the link below the picture, then on the inscription "Download File" at the top right of the page:
 Aero+ start button METRO ORBS Microsoft Metro Start Orbs windows Orb Pack 2 Win7 Start Orbs windows 8 8102 Metro Orb
  Aero+ Glow Start Orb windows 8 New Logo
 The complete collection is here. And this link will be the most popular Start menu icons.
2. Program windows 7 Start Orb Changer
To change the icon, you need a simple windows 7 Start Orb Changer program.
Windows 7 Start Orb Changer v5 can be downloaded from here. Click on the link and wait a bit - the download should start automatically. If this does not happen, click on the word "here" on the page that opens.
3. Instructions for changing the Start menu icon
1. Download and extract the contents of the archive with icons to any folder:
 Unpacked pictures - icons for the Start menu
 2. Download and unpack the windows 7 Start Orb Changer program, run it.
3. In the running program, press the Change button, select our picture, then press the Open button:
 Select and open the Start button icon
 4. We are waiting. The desktop should disappear for a few seconds, then reappear with a new Start menu icon. We enjoy the result:
 The resulting result. The button changes its appearance depending on the action, as the Start button is supposed to behave.
 5. If suddenly you need to return the standard icon, just click the Restore button in the windows 7 Start Orb Changer v5 window, or download and install this icon. Also, nothing prevents you from changing the icon to another - just press the Change button again and select a different icon.
1. The windows 7 Start Orb Changer icon changer is pretty buggy. If during the application of the icon the Desktop disappeared and does not appear for several minutes, press the key combination Ctrl + Shift + Esc, in the Task Manager that opens, click File - New task (Run ...) - enter “explorer” without quotes and click OK. The desktop will appear.
2. If you are unable to change the icon (for example, the program crashes with an error), try taking ownership of the "C:\windows\explorer.exe" file. Instructions on how to take ownership (i.e. get full access to a file) can be found here. This usually solves all problems with changing the icon.
3. If you still can't change the icon (or it changes to the standard one after you restart windows), click the inconspicuous arrow in the corner of the window...
 Click on the little icon in the corner
 And select Change By Editing Resources there:

After that, the icon will change without problems, but only if you become the owner of the explorer file (see the previous paragraph).
glashkoff.com
Change the appearance of the start button in windows
In windows, you can change the design, themes, desktop background, splash screens and shortcuts. But you cannot change the design of the Start button through the standard settings. It displays the Win logo by default. And what if you want to see a different image on the main menu? The only option is to use third-party programs, since the OS itself does not provide the necessary tools. Figure out how to change the "Start" button in windows 7, what utilities are suitable for this, and how to use them.

restore point
The picture of the main menu is tied to the system service "Explorer.exe" (do not confuse it with the name of the browser). The new icon should not affect Win. But still this is a change in OS files. And it's better to create a restore point. If something goes wrong, you can return the settings that were before installing the icon.
- Click the "Start" button.
- Go to "Control Panel".
- Menu "System" in the category "System and Personalization".
- Item "Additional options". He's right.
- System Protection tab.
- Create button.

Click on Create
- Give the restore point a name.
- Wait while the current windows configuration is saved. In the future, you can return to it if critical errors occur.
- To make a backup, click the "Restore" button. It's in the System Protection menu. All available points will be there.
Administrator rights
To change the main menu icon, you need full access to "Explorer.exe". This is the service responsible for the conductor. The file is located in the system root directory C:/windows/. You need administrator rights to edit it.
- Go to this folder.
- Find "Explorer" and right click on it.
- Item "Properties".
- Section "Security".
- Click the Change button.

Now we need to set administrator rights on explorer.exe
- In the "Permissions for the System group" field, set the value to "Full control".
- Click "Apply".
You can also open administrative access to the file using the Takeownershipex program. Find it online, download, install and run. There will be two buttons: "Get Access" and "Restore Access". Click on the first one and specify the path to "Explorer".
Just in case, create backup this file. Just copy it anywhere. If anything, you can change the edited version to the original.
Where to find icons?
It's better not to put the first art you like from your gallery on the "Start" button. Use images specially designed for this. They are already edited, have the appropriate format and size. They also set the correct placement of objects. Suitable images can be downloaded from 7themes or oformlenie-windows.ru. Although there are a lot of resources with free icons.

Possible appearance of the Start button
The icon file must have the .bmp extension (no background). Make sure that it has three options for icons: for the "normal" button, selected and pressed. Try hovering over the main menu. And you will see that it changes depending on what is done with it. Although no one forbids putting one picture for all "states".
Start Button Changer for windows 7
Start Button Changer is a utility through which you can load a new image for the main menu. It has a very simple interface. There are only two functions: installing an icon and resetting to the original settings. Suitable only for Win 7. The name of the program translates something like this: "Start Button Converter." Here's how to use it:
- Find it online and download it. Just enter the query "windows 7 Start Button Changer" in the search engine and select any site. It is better to download from resources that are on the first page in the search results.
- If the utility is in the archive, unpack it.
- There should be an executable file with the .EXE extension.
- Click on it with the right mouse button.
- Item "On behalf of the administrator".

Start Button Changer window
- To change icons, press the "Select & Change" button.
- Specify the path to the icons.
- Click on "Open".
- To restore the original settings, there is an option "Restore Original".
Start Orb Changer for windows 7
Here's how to change the Windows 7 Start icon in Start Orb Changer
- Find it online and download it.
- Unpack if it is in the archive.
- Run it as administrator.

Star Orb Changer
- There will be three icon samples: "Default" (not active), "Hover" (when selected - you need to move the cursor) and "Pressed" (pressed).
- To change them, click on "Change".
- Specify the path to the graphic file.
- The "Restore" button resets the settings and returns the standard icon.
The application has advanced options. To open them, click on the small gray arrow on the bottom right. Only two points are important.
- By Patching Memory. RAM is used to change the main menu.
- Be Editing Resources. Edited by "Eexe".
Classic Shell
The Classic Shell utility is suitable for windows 8 and 10. This is a large-scale program for customizing the Start menu. But now we only need icons in it.
- Download it from classicshell.net. There is a tab "ALL DOWNLOADS".
- Run the installation. To work with the design of the main menu, the Classic Shell Start Menu component is used. You can't download the rest.

Classic Shell Installation
- Open the app.
- On the Menu Style tab, select the All Options option and click OK.
- You need classic Win style
- Check the "Change button image" checkbox.
- Check "Other".
- "Select image".
- Show the path to it.
If "Start" is missing
If, after installing the icon, the menu bar and all shortcuts on the desktop disappeared, you must restart the explorer.
- Launch Task Manager. To do this, use the keys Ctrl+Shift+Esc.
- Go to File - New Task.
- In the input field that opens, write "explorer.exe" without quotes.
- Click OK.
The start button cannot be changed through personalization settings. And in other parameters of Win there is no such possibility. To put a new icon, you need third-party programs. They edit the system file "Explorer.exe", to which the icons are attached.
NastroyVse.ru
Start button for windows 7: how to change the look in the easiest way?
Users of windows-based computers are often very picky, and over time they no longer like the "native" graphical interface of the system. The Start button for windows 7 is no exception. And you can change its appearance.
What you need to change the start button
First of all, it is worth noting that it is not possible to do this by means of the G7. Therefore, the "Start" button for windows 7, or rather its appearance, is changed exclusively by third-party programs. Next, one of the most interesting and popular utilities called windows 7 Start Button Changer will be considered.

But it's not so easy for her. When you try to open it after installation, the system reports that the application must be started as an administrator (this is understandable), but when you select the appropriate launch type from the context menu, nothing works. Why? Yes, only because the user, although he seems to be his own administrator on the local computer terminal, does not have the necessary access rights in the global context (after all, there is also a super administrator). Thus, initially such rights will have to be obtained.
How to change the windows 7 start button: preliminary steps
The lack of administrator rights is directly related to the explorer.exe file, which is located in the windows root directory, so you need to start with it.

Right-click on the file and select the property access line. On the security tab, select the administrator group and click the change settings button located just below on the right. A list of permissions will appear in the window below, where all available components should be checked, and then confirm the changes made.
At the next stage, we use the "Advanced" button on the same tab, again select the administrator group and proceed to change permissions. In the corresponding column, we again set the "birds" in front of all existing lines, and then confirm the changes again.

Be sure to make sure that the user specifies the admin or owner of the computer (the registration name must be written in the appropriate line).
Practical application of the program
Now the start button for windows 7 can be changed. In practice, this is not difficult. First, run the installed utility exclusively on behalf of the admin. After the done actions, everything should work fine.

There are two items in the main window: the first allows you to change the appearance of the button (Select & Change ...), the second is responsible for restoring the original appearance (Restore Original ...). We are interested in the first line. We click on it, and then we look for the Sample Orbs directory (the icons of the Windows 7 Start button are stored here). Choose what you like and click the open button.

It is important to pay attention to the type of folders. If you need to preview images, the appropriate type is selected in the view menu (special button on top) (large icons, huge icons - whatever is convenient for you).
If it is required that the “Start” button for windows 7 acquire the classic look provided by the graphical interface of the “seven” itself, we use the second line to restore the default view in the program. In general, everything is simple.
Conclusion
It remains to be added that the above utility was taken solely as a visual simple example. There are quite a lot of applications for changing buttons and, in general, the entire interface. For example, there was once a very popular utility called windows Blind. It was she who could fine-tune the system interface very finely, however, when emulating an OS of a higher rank, she devoured too many resources. But with modern processor chips and RAM, this problem has disappeared.
As for the primary actions with setting permissions, they will have to be performed in any case, otherwise the system simply will not allow the user to make the appropriate changes in appearance. Yes, before performing all the procedures, it does not hurt to create a system restore point (so, just in case), otherwise you never know ...
fb.ru
How to change the start menu button icon in windows 7
The start menu is located on the taskbar and is a clickable ball containing the windows logo. If you click on the ball, our eyes will be presented with a set of recent running programs and a list of the most necessary items. To make your PC unique and personalized, check out how to change the start button in windows 7 of all editions (Maximum, Home Basic, etc.), in this guide.
When installing a theme in Windows 7, in most cases, the "start" remains unchanged, as it is tied to the explorer (explorer.exe). To fit it into the current design, use programs and pens to change the look.
Change the start button through the program windows 7 StartOrbChanger (W7SOC)
Free program W7SOC, which is able to change the start button on windows 7 with a couple of mouse clicks. W7SOC has a simple interface and is easy to operate. She works:
- With all DPI (if the image is too large or small, the utility will resize itself).
- With X86/32 - bit and X64/64 - bit OS versions.
- With PNG and BMP graphic formats.
To change the start icon in windows 7, do a number of the following tasks:
1. Download the program here and extract it from the archive.
2. Right click on w7soc.exe and enable it as administrator.
3. At the main window, the interface is nowhere simpler. At the top, the 3 states of the start button are shown: default (default), on hover (hover) and when pressed (pressed).
After the states, there are 2 buttons:
- Change - helps to specify the path to PNG and BMP and changes the start button.
- Restore - Resets the changes and restores the default icon.
To expand the settings, there is an arrow at the bottom right.

4. Click on the arrow and you will see an additional menu. In the picture below the numbers, see the decoding. The menu has the following items:
- Change the start button by making changes to the RAM.
- Change the start icon by replacing the original file %WINDIR% explorer.exe.
- Adds a "Start Orb" shortcut to the right-click desktop context menu. This way you can quickly turn on W7SOC.
- Adds a "Set As Start Orb" option to the menu when right-clicking PNG and BMP files. When you select this weave, the appearance of the start button instantly changes.
- Turns off the appearance of a success message.
- When starting the utility, it always displays the extended menu.
- Shows the process running in cmd. The windows 7 command line is called, a cycle is made and after pressing any key, the start changes and acquires a new icon.

5. Customize W7SOC for yourself and click "Change" and specify the path to the icons. There are already 11 different buttons in the "start buttons" folder, select any and click "open". You can also download from the web or draw your own.

Explorer will restart and the start button will change the icon to the selected one. If you want to return the old icon, then click "Restore".
Important! If the taskbar and desktop have disappeared, open the task manager, click file - new task and type explorer.exe in the line and press Enter. If nothing works, then in cmd enter the command to restore the system files SFC / SCANNOW, press Enter and wait for the procedure to end.
We change with the program windows 7 Start Button Changer (W7SBC)
You can change the start menu icon with another W7SBC utility. Worse than the first option, but the result is similar. It is advisable to create a system restore point, or skip this step and use the restore command in case of damage to system files.
1. Download the utility here and extract the archive.
2. Run windows 7 SBC.exe from W7SBC folder as administrator. Do not change the folder name, this action can lead to problems.
3. The current launch design will be displayed on the left side of the main window. With the help of 1 line, it becomes possible to change the start button in windows 7. The line below restores the default icon. Press line 1 with rounded logo.

4. Specify the path to the downloaded or ready (folder 10 Sample Orbs) bmp file. Click "open". Wait until the explorer restarts and see the result.

If you want to return the "start", then click on the explorer icon to restore the original files. Wait for the reboot of the explorer, then, if successful, you will see such a sign.
If you need to change the start button again, first restore the original, and then put a new icon.
If you have followed the steps and the start has not changed, do this:
- Close the program.
- Manually take ownership of the C:windowsexplorer.exe path.
- Run the program, repeat the steps.
Changing the start button in windows 7 will not be much of a strain. For harmony, change the color of the taskbar so that they match perfectly. Of the 2 programs, W7SOC is preferred, it has a number of flexible settings that expand the functionality.
8 or 10, let's dive into history a bit. Once upon a time, Microsoft presented a full-fledged desktop computer with great capabilities for that time to a wide audience. A lot has changed since then: technology has reached the point where today you can pay for a purchase in a store using your phone. Not surprisingly, changing the theme to Windows is also possible.
Even a beginner can handle replacing or installing new themes if he follows all the instructions.
For the first time, such an opportunity appeared with the release of Windows XP, when three beautiful desktop design options were provided to the user's attention. But you probably saw that some of your friends, acquaintances or relatives have some kind of “not like that” Winda. They had different icons, different toolbar along with , different kind of dialog boxes. And then, perhaps, you began to think about how to put this beauty on yourself.
This beauty is nothing but a theme. And here we are talking not only about Windows XP, but also about later versions of this operating system, where the appearance of the workspace is much higher than that of its younger brother. Now users have gone so far as to provide each other with the tools to create their own visual styles! Isn't it great when you can sit down and come up with your own design? In general, there is where to roam. And, if you have already entered this “topic” with us a little, then let's discuss the main question for today: how to change or put a theme in Windows?

Standard themes
Windows 7 and 8
First, without filling your heads, we will discuss how to change the default theme to Windows 7 or 8. Of course, we cannot deliver anything supernatural, however, for some, such a change in the design of the workspace is enough. For starters, please note that you can only change themes in standard ways in versions of Windows 7 higher than Home Basic and Starter. That is, if you have one of these versions, then you can immediately go to the next block. Because Microsoft has removed the ability to change the theme in the younger versions of the seven. Users of other versions of Windows can stay and follow these steps:
- Exit to the desktop and click on an empty space with the right mouse button. In the menu that appears, select "Personalization".
- So, in such a simple way, you got to the page for editing themes and design on your computer. There are two blocks of themes for you here: Aero and High Contrast Themes. Click on any one you like, and it will automatically install on your computer or laptop.
The amazing thing is that you can customize the theme completely for yourself. In the main menu of personalization, where you chose the style, there is a toolbar at the bottom of the page. The desktop background, window color, sounds and screen saver are configured there. Let's go through everything in order.
- Desktop background. We hope there is no need to explain in detail here: you are changing the background image on your desktop. Using standard tools, choose a library of pictures, from which we are already looking and setting the most attractive for you. You can also set the desktop to a solid color (a kind of minimalism).
- Window color. Here you can adjust the color of dialog boxes and the bottom toolbar. If desired, you can turn on transparency, adjust the color intensity. Using the "Show color settings" button, you can select your own shade using the adjuster, without focusing on the standard palette in the same window. And additional design options help you edit the font, its color, size, and other small parameters in terms of the design of dialog boxes.
- Sounds and screensaver. Here, too, an explanation is not required: you can change both the sound scheme and individual sounds, put a screen saver on your desktop after a certain time, and more.
Windows 10
Now let's talk about how to change the theme in Windows 10. In order to enter the personalization settings, repeat the first paragraph from the previous description. Further discrepancies will be quite insignificant, so you will not get confused. Consider all personalization options:
- Background and lock screen. Here you can change the background image of your desktop or lock screen. You can choose from both the standard Windows gallery and the ability to use your own picture.
- Colors and Start will help you customize the color scheme in more detail.
- Topics. Here you can change the overall design. If you go to the "Theme Options" item, then you will see the same personalization window as in the second paragraph of the previous instruction for Windows 7 and 8 users.
- You can download from the official Microsoft website (http://windows.microsoft.com/ru-ru/windows/themes?ocid=w8_client_themes) any theme you like, which after downloading you need to run and install it in the personalization menu, where the standard package is stored .
Third party themes
Windows 7
Now we will tell you how to install third-party themes that can be downloaded from the Internet. Please note that there is a risk of viruses entering your computer or laptop, or an unexpected hardware failure of the system. Therefore, remember that you alone are responsible for the following actions:
- First, install a patch for your computer so that the topics are read. The program is called Universal Theme Patcher and is freely available and free of charge. Download the version specifically for your system - 64-bit or 32-bit.
- Install it on your computer or laptop. Then restart it to make changes.
- Congratulations! Now you can easily change the theme on your device to any theme downloaded from the Internet. Please note that the instructions for installing them are written by the topic author, so read it carefully so that there are no questions later.
- What about Windows 7 Home Basic and Starter users? You need to download the Personalization Panel utility, which will add a personalization button and all its functions, as in other versions of the operating system from Microsoft. That is, you can change themes, as if in a standard OS menu.

Windows 8
- First, install a special program called "Theme Resource Changer" on your device.
- Next, install UltraUXThemePatcher. Please note that after installing these utilities, you may need to restart your computer or laptop.
- Now you can download any theme you like from the network. Then move the documentation for this theme to the Windows\Resources\Themes\ folder. It should contain the theme file itself, as well as a folder with its name.
- If you did everything right, then the downloaded themes will appear in the personalization settings along with the default skin styles.
Windows 10
- Download and install the dedicated UxStyle software on your device.
- Now you can download any theme you like from the web. Then transfer all files of this theme to the folder Windows\Resources\Themes\. It should contain the theme document itself, as well as a folder with its name.
- Go to the personalization settings, launch the "Themes" tab, go to the "Theme Options" item and select the design style you downloaded earlier.
- Ready! You now have a third-party personalization package.
Summing up
So, friends, today we have learned how to change or put a theme on Windows 7, 8 or 10. This can be done both with standard tools and with the help of third-party utilities by installing various software. Naturally, the latter method is not recommended to be used, since such work requires the replacement of some system files, which can harm the operation of a computer or laptop. This does not apply when you download themes from the official Microsoft website for Windows 10. We hope that everything worked out for you and there are no questions left. Share in the comments which theme you like best.